A tableView is used to show a list of objects.
Adding a TableView Using Interface Builder
1. Prepare the superview of your tableView. (Superview is the view where we would like to put our tableview.) In our example, the UIViewController's view is going to be our tableView's superview.
2. Drag a tableView UI to our View.

If you hit run, you will see your tableView on your screen. You can scroll it up and down.

3. Set the tableview datasource and delegate in your Interface file.
@interface ViewController : UIViewController <UITableViewDataSource, UITableViewDelegate>
4. Add an IBOutlet tableview property and synthesize it.
@property (nonatomic, strong) IBOutlet UITableView *sampleTableView;
@synthesize sampleTableView; //.m file below @implementation ViewController
5. Connect your IBOutlet to our tableView in your xib file.

6. Create an array that will hold your list for you. If your items are static (will not change), use NSArray, else, if somewhere in your program, you need to change your array, use NSMutableArray.
@property (nonatomic, strong) NSArray *items;
7. In your viewDidLoad function, allocate and initialize your array with your objects. Currently, let's use simple string objects, NSString.
items = [[NSArray alloc] initWithObjects:@"Item No. 1", @"Item No. 2", @"Item No. 3", @"Item No. 4", @"Item No. 5", @"Item No. 6", nil];
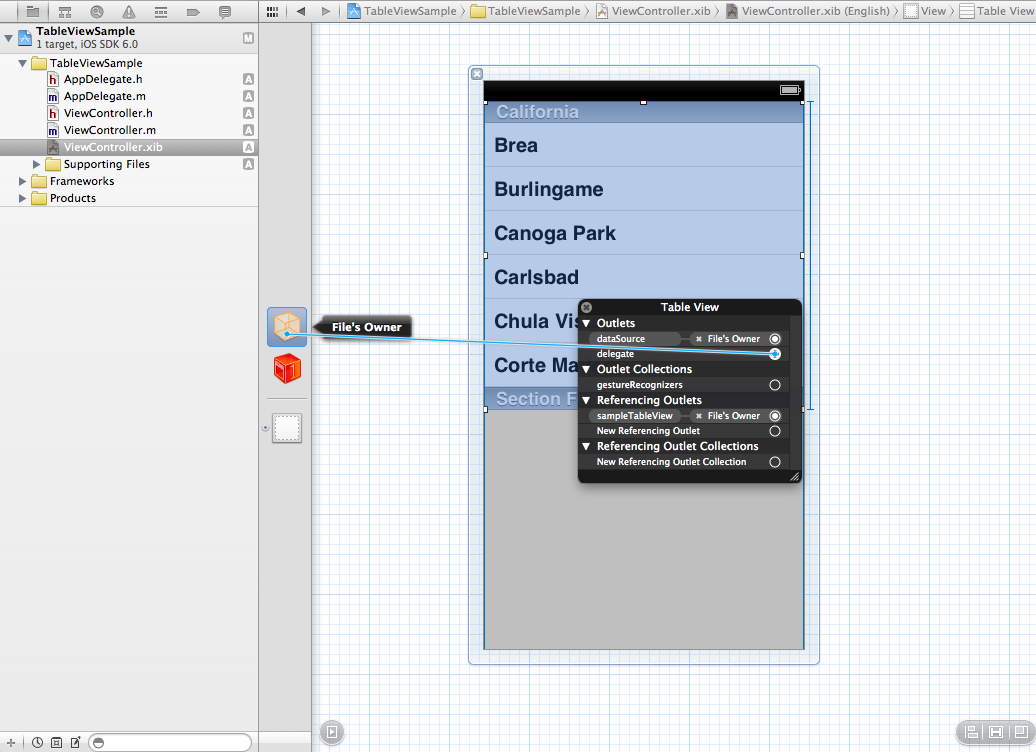
8. Set our sampleTableView's datasource and delegate to its File's Owner.
9. Lastly, implement the UITableView Datasource and Delegate methods. These are necessary to manipulate our tableView.
#pragma mark - Table view data source
- (NSInteger)numberOfSectionsInTableView:(UITableView *)tableView {
// Return the number of sections.
return 1;
}
- (NSInteger)tableView:(UITableView *)tableView numberOfRowsInSection:(NSInteger)section{
// Return the number of rows in the section.
// Usually the number of items in your array (the one that holds your list)
return [items count];
}
- (UITableViewCell *)tableView:(UITableView *)tableView cellForRowAtIndexPath:(NSIndexPath *)indexPath{
//Where we configure the cell in each row
static NSString *CellIdentifier = @"Cell";
UITableViewCell *cell;
cell = [tableView dequeueReusableCellWithIdentifier:CellIdentifier];
if (cell == nil) {
cell = [[UITableViewCell alloc] initWithStyle:UITableViewCellStyleDefault reuseIdentifier:CellIdentifier];
}
// Configure the cell... setting the text of our cell's label
cell.textLabel.text = [items objectAtIndex:indexPath.row];
return cell;
}
/*
// Override to support conditional editing of the table view.
- (BOOL)tableView:(UITableView *)tableView canEditRowAtIndexPath:(NSIndexPath *)indexPath{
// Return NO if you do not want the specified item to be editable.
return YES;
}
*/
/*
// Override to support editing the table view.
- (void)tableView:(UITableView *)tableView commitEditingStyle:(UITableViewCellEditingStyle)editingStyle forRowAtIndexPath:(NSIndexPath *)indexPath{
if (editingStyle == UITableViewCellEditingStyleDelete) {
// Delete the row from the data source
[tableView deleteRowsAtIndexPaths:@[indexPath] withRowAnimation:UITableViewRowAnimationFade];
}
else if (editingStyle == UITableViewCellEditingStyleInsert) {
// Create a new instance of the appropriate class, insert it into the array, and add a new row to the table view
}
}
*/
/*
// Override to support rearranging the table view.
- (void)tableView:(UITableView *)tableView moveRowAtIndexPath:(NSIndexPath *)fromIndexPath toIndexPath:(NSIndexPath *)toIndexPath
{
}
*/
/*
// Override to support conditional rearranging of the table view.
- (BOOL)tableView:(UITableView *)tableView canMoveRowAtIndexPath:(NSIndexPath *)indexPath
{
// Return NO if you do not want the item to be re-orderable.
return YES;
}
*/
#pragma mark - Table view delegate
- (void)tableView:(UITableView *)tableView didSelectRowAtIndexPath:(NSIndexPath *)indexPath {
// Navigation logic may go here. Create and push another view controller.
// If you want to push another view upon tapping one of the cells on your table.
/*
<#DetailViewController#> *detailViewController = [[<#DetailViewController#> alloc] initWithNibName:@"<#Nib name#>" bundle:nil];
// ...
// Pass the selected object to the new view controller.
[self.navigationController pushViewController:detailViewController animated:YES];
*/
}
10. Hit Run!

Adding a TableView Programmatically
1. From the steps we had above, delete the tableView UI in our xib file, and delete the IBOutlet from our tableView property.
@property (nonatomic, strong)
2. On your viewDidLoad function (of your ViewController.m file). Follow the commented steps.
- (void)viewDidLoad {
[super viewDidLoad];
//Create a tableView programmatically
self.sampleTableView = [[UITableView alloc] initWithFrame:CGRectMake(self.view.frame.origin.x, self.view.frame.origin.y, self.view.frame.size.width, self.view.frame.size.height / 2) style:UITableViewStylePlain];
//Add the tableview as sa subview of our view ---> making "view" our superview.
[self.view addSubview:sampleTableView];
//From step 7 above.
items = [[NSArray alloc] initWithObjects:@"Item No. 1", @"Item No. 2", @"Item No. 3", @"Item No. 4", @"Item No. 5", @"Item No. 6", nil];
//From the step 8 above, this is how we do that programmatically
self.sampleTableView.delegate = self;
self.sampleTableView.dataSource = self;
}
3. Done! When you hit run, you'll see the same result.